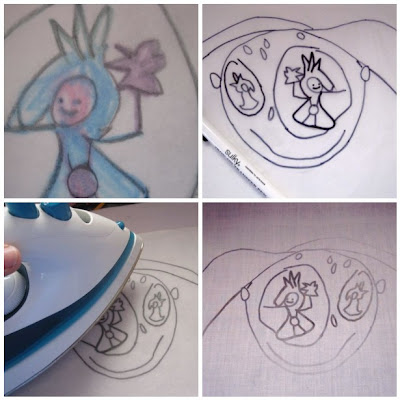
 Phoebe calls her drawing "The girl who sees princesses." As soon as she brought it home this past spring, I knew I had to embroider it.
Making an embroidery from original artwork is quite easy so I thought I'd give you a quick tutorial in case you wanted to try your hand at it.
 Above is Phoebe's original drawing. Cute, right?
 The steps below match the pictures - read across.
Step 1: Trace the drawing with pencil onto tracing paper or regular copy paper.
Step 2: Now you want to make a mirror image of the drawing with a transfer pen. I have tried several and like the Sulky Iron-on Transfer Pen best. So, turn the pencil drawing over and trace your lines with the transfer pen. This way, you'll get the mirror image, see? (compare original drawing to this picture)
Step 3: Iron the image - transfer pen side down onto fabric.
Step 4: You're ready to embroider! Even though my image isn't dark everywhere, it will work fine since I'm embroidering over the lines.
**No transfer pen or you don't want to go through all this? Sometimes, I just tape the image onto a window and trace over it with pencil onto my light colored fabric.
 Here's a detail of the embroidery. I tried to keep the colors true to the original drawing. I used a split stitch for the outline and satin stitch for filling in. Small little details and lines were made with a back stitch. I like this little pocket guide for embroidery stitches if you need some directions.
2 comments:
Thanks for this idea! I have some kid drawings that would be perfect for this. (And floss just waiting to be used.)
awesome idea
Post a Comment